Sunday, 2 June 2013
Recent Photoshop Painting and my Nepal Sketchbook
Over Easter I went on an incredible mountaineering trip to Nepal, I spent 3 weeks with no modern technology trekking through (in my opinion) the most beautiful scenery in the world and climbing the Tharong La Pass (which is 5500m above sea level and a week of trekking away from civilisation). The only drawing materials I took with me was an A4 sketchbook, some mechanical pencils and a figure drawing book. Whilst I didn't draw anywhere near as much as I thought I would (after walking all day at altitude I was too tired to think straight) I still did a few sketches;


 An old woman in one of the villages;


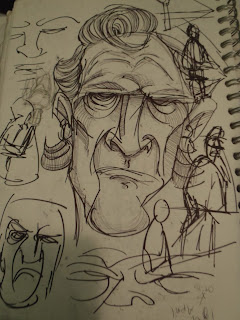


3 weeks with no computers, television or photoshop really improved my drawing. I had a 12 hour wait in Qatar airport on my way there and I stupidly filled up half my sketchbook with absent minded scribbles as I sat in the departures area. I then realised I was running out of paper on the third day so I had to be really picky with what I drew and the size that I drew as I tried to conserve paper.


I haven't been doing as much photoshop painting recently as I'm spending more time learning modelling and trying to learn lighting theory, anatomy and colour theory so I can become an all round better artist.
Here's a photoshop painting of a buddhist monk I did a few weeks ago, it was one of the first portraits I've done in photoshop without any reference. I wanted to use really rich, vibrant colours but first I did a black and white sketch to determine the values.

With colours added; (click on the image to see it at a normal size)
Red or Dead Project
Our Red or Dead film;
My role in my group
began shortly after we were given the brief; I immediately had a lot of ideas
for the project so I set about drawing concept images and developing an outline
of what could happen. The group agreed to use an idea I had which featured a
baby crashing into a city and shooting people with a laser gun that changed
their outfits into Red or Dead brand clothing. I set about designing a baby and
the gun as well as developing the overall story with the rest of the group.

I
then helped create a basic thumbnail storyboard and then made layered photoshop
paintings for each panel so that Alex Watkins could vector animate the layers
to add some movement to the animatic.


I drew over 40 colour photoshop paintings
which included the lighting for the final animation as well as the design and
look for the film.
After receiving
feedback on our animatic I drew a new storyboard and helped change a lot of the
storyline (we were told that we would not be lent enough clothes by Red or
Dead). I had the idea of changing the overall concept so that
instead of the baby
changing the clothes he changes his surroundings so that they are more
appealing to him. When drawing the storyboard I researched the cinematography
of mainstream action films; I found it was best to frame the characters holding
the rifles horizontally as it makes him look more powerful and intimidating as
well as adding drama to the overall piece. I also learnt a lot about
manipulating the depth in scenes so that they don’t feel so flat, I never shot
anything front on or side or and made sure that there was always an object in
the foreground, background and front of the shot.
I then helped with the
filming of the actors on green screen. I unofficially acted as the director of
cinematography, positioning the actors so that the shots had depth and filled
the frame. My task was to model and texture which baby that was by far the most
laborious task. I began modelling the baby as soon as we decided that it was going
to be in 3d, once I had finished the character turnarounds I made a very basic
block model so that I could work out the volume of the character and its
overall flow. I then extrusion modelled it starting with an eye and working my
way out until I had a full face. The torso, arms and legs were then modelled
separately and attached together. As I write this maya keeps crashing as I try and open the model so I can't take screenshots of the model but I've pinched some screenshots off Alex Watkins blog from when he was rigging it so you can see the wireframe and the baby without any textures;


I exported the basic
extrusion model into mud box where I subdivided the geometry and did some
further sculpting (particularly on the head). I then textured the baby in
mudbox by painting it white and then using a picture of a baby I found on
google images to as a texture stencil. The original idea had been to do high
detail bump maps but I found that the baby looked creepy with realistic skin
tones and textures. I painted the baby one colour and highlighted certain areas
to compliment the shapes. I then added pink and red to his nose and cheeks.
Whilst I modelled the
Space Baby I also modelled “the gherkin building” which gets shot by the baby
and has vines wrap around it. I applied glass textures and learnt how to use
paint effects to make 3D vines that I then animated. Next I made a pair of
spirals which went up the outside of the building and scaled them so that one
was right next to the vines and the other was further out, I attached a camera
to the wider spiral and the directional point to the smaller spiral. I then
animated the camera and point along the two spirals to so that it followed the
vines as they wrapped around the gherkin model.


Alex Watkins made a
very basic rig for the baby as we were running out of time and I posed the
model. We made the mistake of underestimating how difficult and time consuming
rigging was and because I did not check the rig as it was being made there were
some errors. The elbow joint was far too high up the arm which hugely limited
how the model could be posed and the simplicity of the rig made animating it
impossible (the gun could not be attached to the hands and key framing it
separately would have taken far too much time) so the baby ended up being very
static. I posed the baby and set up the cameras for rendering before passing
the scenes on to the rest of the group.


When checking the
shots of the baby in the render view I realised that the model did not look
very good with the scene lighting (everything had been lit using a sky dome). I
decided to add in extra lighting for every shot of the baby so that it would
stand out in the scene and look more visually appealing. I added directional
lights with a very high falloff to create a rim light around his head and then
positioned point lights with various intensities to the areas that I wanted to
appear reflective. This improved the look of the baby a lot and made the
improved the quality of the film as a whole, it would have been good to have
done this on a lot of the other shots but we did not have enough time because
we had to start rendering quite early. My final task was to help with the
editing process and with finding free sound effects online.
The baby with the scene lighting;
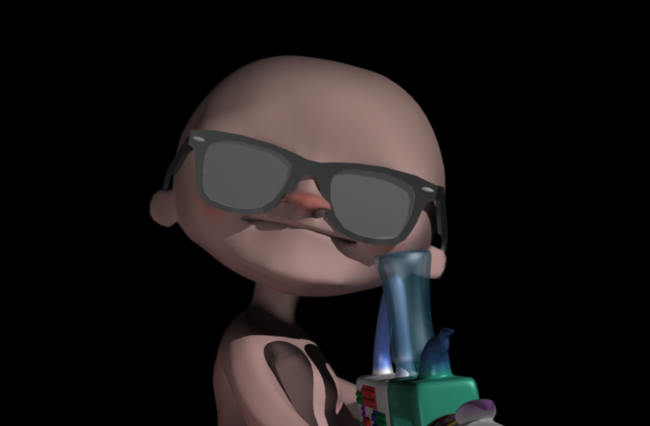
With added spot lights to make the surfaces reflective;


Overall I am happy
with how the project turned out although I feel there is still room for
improvement. In future I will leave a lot more time for rigging and make sure
the whole group checks every shot before they are rendered so that improvements
can be suggested before it is too late to do anything. I will also spend a lot
more time concentrating on lighting as it can improve the scene a lot more than
people realise.
A Crash Course in 3D Modelling
Just before I left for Easter I decided to have a go at 3D modelling. Whilst I had tried a little bit of 3D modelling in maya last year I had not properly picked up the basics and I struggled to follow tutorials. When I was working on Kirk's third year project I was watching the modelling process for the Goblin character and one night I started playing around in maya trying to make my own version.
I had not yet learnt the basics of modelling so the geometry so the geometry is pretty horrible (I didn't know everything has to be made out of polygons so I was using a lot of Ngons and trigons) and I didn't understand the flow yet. My approach was basically to start with a cube and then add edge loops and move the vertices until I got the basic shape, I would then use the interactive split tool to add more geometry and detail.


Although this is a pretty terrible model everyone has to start somewhere and it was really useful to try modelling something which I had also designed. I would definitely recommend that 3d modelling your character designers because it made me think about the volume of the character and the general shape. I often look at my character turnarounds and think that I spend to much time on the front view and ignore the back and sides and this has helped me to understand the design as 3D shape.
Next I decided to model a monkey I had designed recently, once again I started with a cube, added more geometry and extruded out the limbs and head.


The model needs some more work as I think the character looks off balance in the side view (also the tail and hands need modelling). If i have some spare time over the summer I want to put ome more work into this and sculpt and texture it in mudbox. Although the geometry is a lot better on this model (it's all polygons this time) it still doesn't have the polygon flow I was aiming for. I spent about a week working on this in the evenings (I worked on my coursework during the day).
So having learnt the basics through trial and error I decided to set a weekend aside and solidly work until I had a 3D model of a head (with the occasional break for food or exercise). Over the summer I read a book on dynamic figure drawing which, with some practice, really improved my ability to draw heads (check it out here)(I'm currently working through the theory of drawing the rest of the human figure). I had drawn Walter White from "Breaking Bad" a few times since the summer so I'm very familiar with Bryan Cranston's face which was useful as I was modelling.


This really wasn't easy and I felt like giving up a few times but I pushed through and this is how far I got. By the end it was approaching Monday morning (I began Friday evening) and I needed to stop and work on something else. I don't think this will ever be fully finished as I'll always notice bits that can be tweaked or details that could be added but this is where I got to. If I'm honest I was stupid to go for something this ambitious (I'd only been 3D modelling for 3 weeks, this was the third thing I'd modelled and I'd never sculpted in mudbox before) but I'm still proud of what I achieved. I think sculpting in mudbox is easy if you can draw because all the skills are transferable. After this I also noticed my drawing skills improved and I gained a greater understanding of the structure and form of the face.
Subscribe to:
Comments (Atom)